Some research for a car float layout placed here so that I'll know where to find it
http://youtu.be/zUCJNx-Ex6w
http://www.flickr.com/photos/triborough/2957778253/
http://www.railpictures.net/images/d1/2/9/7/1297.1307503064.jpg
http://yourrailwaypictures.com/TrainStations/CPR_Station_at_Nakusp_BC_and_yard_1935.jpg
http://www.flickr.com/photos/foamerbill/4503058348/
http://media.photobucket.com/image/recent/stinksandbangs/Port%2520Rowan%2520in%2520S/Resources/RailwaysKootenay.jpg
http://www.railpictures.net/viewphoto.php?id=378904&nseq=3
http://www.railpictures.net/viewphoto.php?id=404516&nseq=1
That'll do for now
Saturday, January 12, 2013


Friday, January 11, 2013
Thoughts on building a car float model railroad
(This piece was originally published on the Micro Model Railroad Cartel blog on Tuesday January 8th)
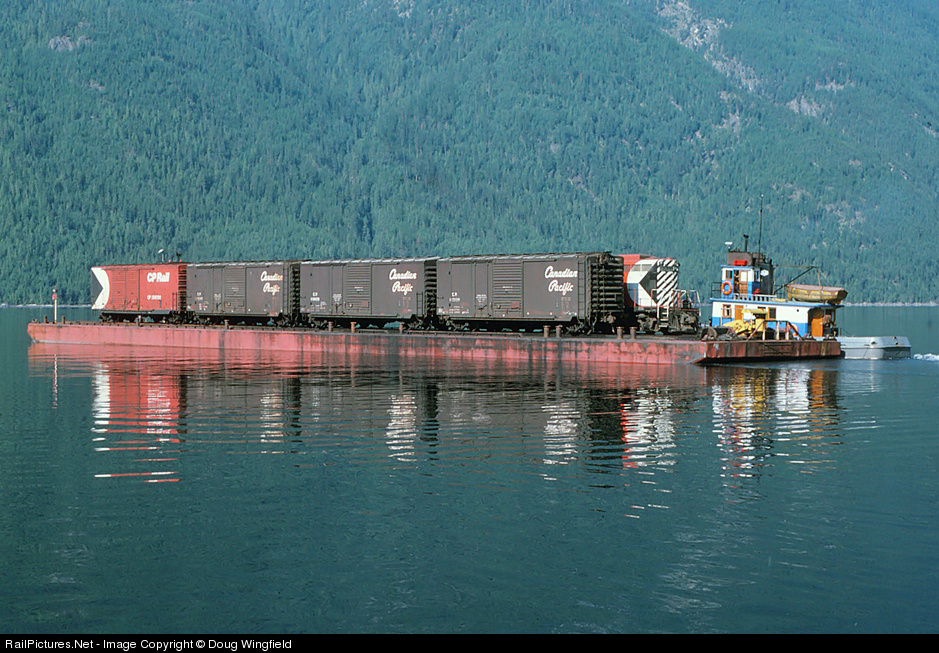
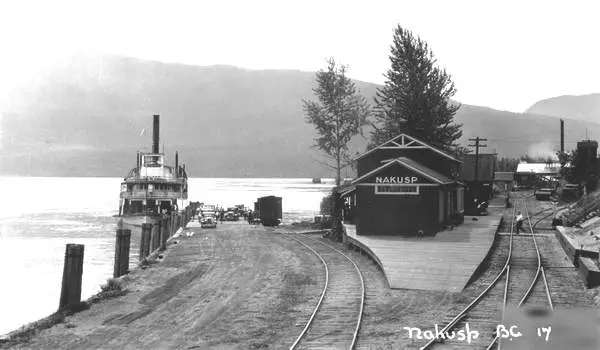
It's no secret then that I am quite taken with that image of the Naksup wayfreight on the car float. Plenty of inspiration to be had in that photograph. Short prototype length trains in a small space. I figured you could fit the design in about four feet in length in HO scale. I also figure that you could probably fit the concept into an APA box in Z scale.
But before I get too carried away with the scheme lets look at what you'd get in your small space layout. The trackplan is as simple as it gets. Two sidings. You don't even really need any switches. That is the root of the problem with the scheme. If you look at the layout from the point of view of a person who has no idea of what the layout is about would see a locomotive push and pull cars on and off the car float. Not terribly exciting, I'm sure you'll agree.
We need something more to lift the layout above the ordinary. To make people want to take a closer look.
How about making the car float move? Not too difficult a task for some clever modellers I'm sure. I bet there's several different ways to go about making the carfloat move. Those who know me will know I believe in operating features to lift the visual appeal of small layouts.
That would really make the layout different. But where would the carfloat go to? It would have to go offstage somewhere like the trains appear from offstage. I'll leave you to think up your own schemes I have my own ideas.
But when it comes down to it you're still only shoving wagons on and off the car float not terribly interesting operation for the operator.
So lets make a bit more of the shoving of the cars on and off the car float. Take a look at this image of the dock at Woodfibre British Columbia, there's a small yard right alongside. This is a promising development. This could be a very interesting way of going about building on the scheme. Operation would be considerably expanded over the original concept. A locomotive brings a cut of cars into the yard where it is sorted prior to being loaded on the car float. A loaded carfloat arrives, the cars on the float are changed out for those on the dock and the carfloat leaves, then the locomotive leaves with train that was on the float. Sounds pretty good doesn't it?
That's just my thoughts, thats how I would approach the idea.
Waking up...
After 14 months of inactivity I wonder if anyone still reads this?
My Z scale activities may have been dormant but my model railroading hasn't. I've built layouts and explored several new avenues of railway modelling. Even inventing one that was a world wide craze for a while. Though initially not as successful as I hoped for me personally. I was always open to another go at the project.
Then I had this picture bought to my attention. What a delightful scene, and so model-able and you could even fit it into a small space. Say 4' long even in HO scale. This would have been the kind of idea that my late, dear friend Carl Arendt would have gone for in a big way. I mooted the idea in HO scale but strangely the idea that appeals most to me is to create this sort of scene in an APA box in Z. I bought a whole load of the boxes. I also have stock and track to build this in Z scale.
I've said before that I like Z scale. I was really impressed with the quality of the running of the set I have when I ran it at the Granite City Train show. I've been wanting to do something more with Z but I've been waiting for the inspiration to get a project up and running. To be honest, I wasn't expecting it to fall together like this. So we'll see how things develop.
My Z scale activities may have been dormant but my model railroading hasn't. I've built layouts and explored several new avenues of railway modelling. Even inventing one that was a world wide craze for a while. Though initially not as successful as I hoped for me personally. I was always open to another go at the project.
Then I had this picture bought to my attention. What a delightful scene, and so model-able and you could even fit it into a small space. Say 4' long even in HO scale. This would have been the kind of idea that my late, dear friend Carl Arendt would have gone for in a big way. I mooted the idea in HO scale but strangely the idea that appeals most to me is to create this sort of scene in an APA box in Z. I bought a whole load of the boxes. I also have stock and track to build this in Z scale.
I've said before that I like Z scale. I was really impressed with the quality of the running of the set I have when I ran it at the Granite City Train show. I've been wanting to do something more with Z but I've been waiting for the inspiration to get a project up and running. To be honest, I wasn't expecting it to fall together like this. So we'll see how things develop.
Saturday, October 8, 2011
T minus 35
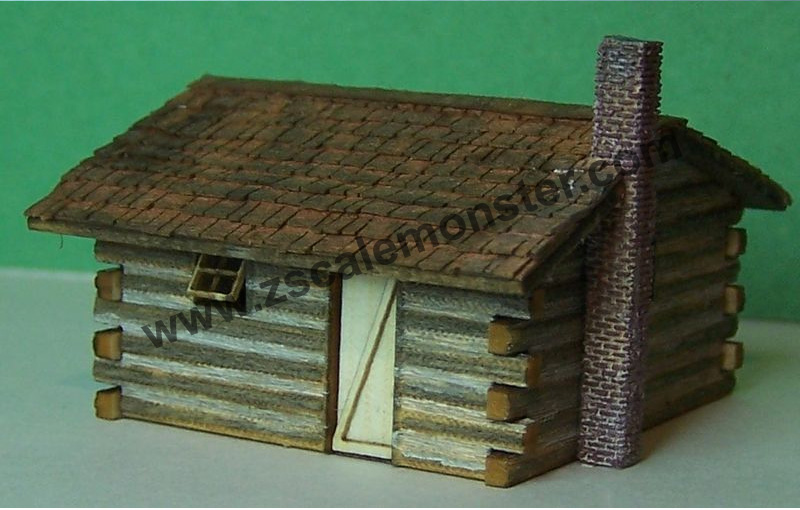
Days to the Granite City Train show that is. I love the show. It' s always a great deal of fun and people really enjoy seeing the small trains I bring along. The Z scale layout already runs very nicely. So all I have to do is build the structures that arrived from Zscalemonster the other day. That is the log cabins and passenger station shelter I referred to in my last post. I'm always amazed when I open the bag of tiny lazer etched pieces of wood and see how they all fit together and these from RSLaser and GCLaser don't disappoint at all. The kits look so simple and the fit of the kits is nigh on perfect. A log cabin campsite served by a small passenger depot will make a nice touch on the model.
Friday, September 30, 2011
Summer is over. Model Railroad fun begins
Yes. The leaves outside are turning orange and red and yellow. The MGB is ready to be packed away and I'm ready to have some fun in the model railway world again. The summer break is most welcome, I can forget about things for a while and come back refreshed. The Saint Cloud, MN Granite City Train show is coming up in November and its pretty traditional that I take my collection of "small" model trains to that show. The T scale is coming out of retirement, I'll take along some of my Nano Model Railroading efforts if I think they are worth it when I get them finished and of course the Z scale layout too. Now, way back earlier in the year, on a high from showing it the last time I said I was going to add some more bits and pieces to the layout. A few structures perhaps. I have not forgotten this. I'm looking out for some nice small structures to add to the layout to add some character. I do like these cabins from RSL Laser. But I'm looking for a nice easy smaller depot kit too. Something like this one. But thats an extensive conversion of an existing kit. I'm looking for a relatively quick straight build I think. Any ideas? Feel free to pass on any thoughts.
Thursday, May 12, 2011
An observation about switching
Speaking as a railfan. I'm lucky.
Lucky that my office overlooks a small rail served industrial park and every afternoon a train of varying lengths pulls into the yard and cars are spotted to the industries hereabouts.
Now, apart from the fact that this could be a highly desirable prototype to model for a future layout. (Let's not go there just yet.) I get a daily opportunity to watch switching operations and see how trains really run at slow speeds.
From my office window they run smoothly. No bumping and banging and bouncing over sagging track. From here, no more than 50 yards away everything looks perfect. I know it isn't of course because I've stood down there and heard the bumping and banging and seen the bouncing.
From here it looks just as smooth as the Z scale GP35 did running on my layout from about a foot away.
Now in HO scale and upwards I know modellers can go to great pains to recreate the bumps and bounces of older track. Whereas it is very clear that in Z scale you don't need to bother even if you plan on viewing your model even from as close as your eyes can stand.
Lucky that my office overlooks a small rail served industrial park and every afternoon a train of varying lengths pulls into the yard and cars are spotted to the industries hereabouts.
Now, apart from the fact that this could be a highly desirable prototype to model for a future layout. (Let's not go there just yet.) I get a daily opportunity to watch switching operations and see how trains really run at slow speeds.
From my office window they run smoothly. No bumping and banging and bouncing over sagging track. From here, no more than 50 yards away everything looks perfect. I know it isn't of course because I've stood down there and heard the bumping and banging and seen the bouncing.
From here it looks just as smooth as the Z scale GP35 did running on my layout from about a foot away.
Now in HO scale and upwards I know modellers can go to great pains to recreate the bumps and bounces of older track. Whereas it is very clear that in Z scale you don't need to bother even if you plan on viewing your model even from as close as your eyes can stand.
Wednesday, May 11, 2011
Next steps
Where to from here with my Z scale adventures?
I have to admit I was definitely on a bit of a high after the show the layout had run so well. Especially as a "well meaning" N scaler went to great pains to tell me that the Micro Trains GP35 was noted for overheating and could melt the body of the loco. Well matey boy, it didn't. It ran faultlessly for six hours and never felt warm.
The next steps then. Well, I've ordered a couple of kits. A Z track craftsman kit of a centrebeam lumber car. The prototype is a car I see a lot of when I'm out lineside watching trains. They are a pretty distinctive prototype and the kit is not unreasonably priced. When finished, it will add more interest to the freight train as it runs around the layout.
I have to admit I was definitely on a bit of a high after the show the layout had run so well. Especially as a "well meaning" N scaler went to great pains to tell me that the Micro Trains GP35 was noted for overheating and could melt the body of the loco. Well matey boy, it didn't. It ran faultlessly for six hours and never felt warm.
The next steps then. Well, I've ordered a couple of kits. A Z track craftsman kit of a centrebeam lumber car. The prototype is a car I see a lot of when I'm out lineside watching trains. They are a pretty distinctive prototype and the kit is not unreasonably priced. When finished, it will add more interest to the freight train as it runs around the layout.
Then for a bit of fun I ordered a pack of these, picnic tables from rslaser.

Fun? Yes. they'll be pretty small. Just how small I don't know. Knowing how small I'll be able to work in Z will help me decide just what I can do. When I get some of these built I'll add a picnic site to the layout for a little visual feature.
What else?
In a few weeks I'm off back up to the Knife River locale again. I'll be running Grandmas Marathon again. The old depot at Knife River still exists to the best of my knowledge so I plan to pay it a visit, photograph it and then construct a model of that and site it on the curve at the front right where there is plenty of space to fit it in.
Another item of rolling stock would be nice. The American Z lines Budd RDC-2 perhaps, to provide a passenger service to the new depot. It's not exactly the same as the RDC-3 that the DMIR used but would be near enough for me I think.
Should be enough to keep me going for a while I think. When I get those projects done I think I'll be well on the way to deciding what I can achieve in Z.
Thursday, May 5, 2011
"One instinctively knows when something is right"
Dredged up from my memory is that tagline from an old TV ad for Croft Original Sherry. It came to mind whist I was watching the train circle around the layout at the Granite City train show on Saturday.
Z scale is right. Well, right for me anyway. Right.
What on earth does that mean?
All proponents of whatever scale they practice claim that their scale is "right" some even go so far as to claim their scale is perfect, citing all kinds of reasons and theories. For them, maybe their chosen scale is right. Some folks won't even consider that other scales have anything going for them.
All I know is I got a definite feeling that Z scale was right. It's not a feeling I've ever had with T scale (I like T scale for the reactions of the viewing public more than what I do with it)
As much as I like HO scale and as productive a modeller I am in the scale, Z feels different. I can't describe it.
In fact there's only one other scale that I've had this "rightness" feeling for and that's Gn15. You can't get more different than Z scale standard gauge than large scale narrow gauge. But both have tapped into certain attitudes to my modelling and my abilities to carry these attitudes out to a standard that I'm happy with. I'm not saying it leads to perfect modelling. Far from it. It's modelling that I'm happy with. I have several layouts in unfinished states because I didn't get that right feeling from the scale. Now with Z I've got it again, which is good, because it means I'll carry on and perhaps build "that layout", the one I've been trying to build all my life.
Saturday, April 30, 2011
Making an exhibition of myself
I am now returned (and recovered) from the Granite City Train show where a great time was had by all. Those of you who follow my other blogs know that I can't speak highly enough of the show. It's always a pleasure to attend and this year was no exception. Ed Olson, the organizer said that this was the most successful show to date and I can believe him. I came away from the show with a very sore throat which means I must have been talking a lot. I did a lot of explaining of the difference between Z and T.
We were sited next to an N scale layout so that made for a very effective demo for the punters of the relationship of the differing sizes of the scales.
After I arrived and set up I made a quick trip over to the Perrys Hobbies stand to see if he had any Z scale for sale he had one piece, a Micro Trains TTX flat car so I bought it and quickly added it to the layout. Luckily for my wallet Perry had left his Z scale cases at the shop.
When the doors opened it was relentless for about 5 of the 6 hours of the show. Talk, talk, talk. It was all a blur at times, especially the first couple of hours. I made my regular appearance on local station W-JON hopefully putting across a positive image of the hobby.
What can I say about the running of the layout.
Perfect. I can't say any better than that.
We were sited next to an N scale layout so that made for a very effective demo for the punters of the relationship of the differing sizes of the scales.
After I arrived and set up I made a quick trip over to the Perrys Hobbies stand to see if he had any Z scale for sale he had one piece, a Micro Trains TTX flat car so I bought it and quickly added it to the layout. Luckily for my wallet Perry had left his Z scale cases at the shop.
When the doors opened it was relentless for about 5 of the 6 hours of the show. Talk, talk, talk. It was all a blur at times, especially the first couple of hours. I made my regular appearance on local station W-JON hopefully putting across a positive image of the hobby.
What can I say about the running of the layout.
Perfect. I can't say any better than that.
Here's some film of the layout running.
It ran like this for the whole six hours of the show. I would run the consist one way for an hour and then the other for an hour. It was perfect. I'm really really impressed with the running quality of this set. It certainly spurs me on to do a little more with Z.
I just want to close by once again giving out a big thanks to Ed Olson and the crew for putting the show on. It is always a great time.
Thursday, April 28, 2011
Exhibitable
Here we are, ready to show. It didn't take all that long to get this stage. Five or six days perhaps. There's a few things that I could put right if I had more time but I think (I hope) that people will enjoy taking a look at it.
 Above: An overall view. The overall size is 30" x 20". There's lots of different types of trees some Woodland scenics trees, Woodland Scenics fine leaf foliage and home made pine trees.
 Above: A close up of the bridge. Overall I'm really really pleased with the bridge. I'm still not totally comfortable with the self adhesive qualities of the stone material but the effect of it is well and truly worth it.
 Above: The "accidental" rock face. It's just a rough cut expanded polystyrene painted with Woodland scenics Earth ground colour. It looks really quite convincing.
 Above: Another view of the bridge. Alas, you can see a section of handrail dropped off whilst I was handling the layout for the photos.
So far constructing the layout has been a very rewarding project. I think I have a "feel" for working in Z scale now. I have to say I like it so far. I'm curious to take my adventures further.
Wednesday, April 27, 2011
Trains run!
Exciting day day today. Not only did I watch Ishant Sharma take 5 for 12 for Deccan Chargers against Kochi Tuskers in the IPL but I had trains running on the Knife River model. To prove it here's some film.
The layout is coming together nicely.
Meanwhile it snows outside..
Tuesday, April 26, 2011
Bridge comes together (layout progress 5)
Today was a grey, wet, horrible day. Hardly worth having the day off work to be honest. Then again if the weather had been nice I probably would have been out in the MGB now that it is out of winter storage. So the weather forced me on to getting the bridge closer to completion. Here's a few photos via the iPhone and Photoshop express...


 ...I reckon it looks the part.
Monday, April 25, 2011
the grass is greener... (Layout progess 4)
This week I booked the time off work to prepare both layouts for the Granite City Train show. With Gonou already working I can devote the time to completing the Knife River Bridge display.
A bit of ground cover first. Nothing too detailed yet. Some earth coloured Woodland scenics ground cover followed by a coating of a mixture of different greens. Kind of like an impressionist painting. All fixed in place with Woodland Scenics scenic cement.

So, onto that strange pastelly, fawny, browny streak in the middle where the Knife River should be. Hereabouts the Knife River is actually very shallow and beautifully crystal clear with lots of stones on the bed. So a deep blue is out of the question. My thought is to create a sort of impressionist painting (there's that phrase again) of the river bed. Then paint some gloss medium over that and then scatter some Woodland Scenics (there's that name again) Talus of varing sizes into that. Hopefully that should re-create the effect I'm after.
Saturday, April 23, 2011
Yes it is that easy!
A couple of posts ago I said that I was going to have to slice up a couple of sections of MicroTrains track to fit on the layout. I was going to use these instructions on the James River website. It seemed easy enough and I can report that it is.
1. Cut out the middle section so that the roadbed forms the length of track you'll need.
2. Nip off the fixing pins.
3. Slide the 2 sections of roadbed together and glue them.
4. Fit the track and rail joiners.
Bingo! Shortened track!
No point in posting pictures because the finished sections of track look just as they do on David's website.
Thursday, April 21, 2011
The snow has gone (layout progress 3)
The "Minnesota winter" stage of layout building never lasts very long. Significantly shorter than an actual winter. A coating of my favourite Woodland Scenics Earth colour soon kills the white and starts to make the ground look like ground.


Wednesday, April 20, 2011
Layout progress (2)
This one of those "I love it when a plan comes together" sort of posts. Things are definitely beginning to look up. Things are progressing well. The polystyrene landscape formers have been hacked into some sort of shape and are being covered with lightweight spackle. The scene really does start to resemble a Minnesota winter scene!

 Here's the bridge talking shape. The abutments are clad in the Chooch flexible stone sheet and the handrails are fitted.
 Here's a closer look at one of the abutments. This Chooch sheet is a super material, quite possibly the most convincing stone material you can buy "off the shelf". Superb relief and texture. It's easy to work with, though being flexible you have to be careful cutting it as you can stretch and bend the material as you cut it. I'm in two minds about the self adhesive quality though. Like I said in a previous post it's "tacky" rather than "sticky". The recommended substrates are Masonite, Pink foam and thick card. I used a thick card on these abutments and the material still slides around on that and isn't fixed in place as such. The instructions say you can also apply adhesive to the backing paper if you have problems. But that really obviates the need for the self adhesive backing, doesn't it?
 This is the only downside to the material though. I really do like it. They need a little colouring to look more like the native North shore stone and to also hide the cut edges but the instructions cover that too.
All in all a worthwhile product.
Sunday, April 17, 2011
Layout progress (1)
After Fridays "blocking out" it didn't take long for some tangible progress to appear. I started to slice away at the white foam with my new hot wire cutter and the landscape began to appear. The picture below shows the "typical Minnesota winter" stage of layout building; i.e. everything is white. You can see how I have quite literally been hacking away with a knife and hot wire cutter to give the ground some shape. The roughness is of no consequence as the next stage will be to cover it in lightweight spackle once I have added a little extra to the river bank, finished the bridge abutments and bedded them in.
 What you will also notice is that there is a big old gap between the end of the bridge and the beginning of the curve. Sixty-seven millimeters of gap to be exact. The shortest length of MicroTrains roadbed track is 110mm (what kind of knuckle-head thinks that 110mm is a good shortest length of track). So I need to shorten a couple of sections of track by 43mm to fit them in. Not a difficult task as there is a step-by-step guide here on David K. Smith's James River Branch website. I knew I'd seen this in my previous trawlings through the site and it only took a few minutes to find it again. The process looks pretty easy to do. I've got a pack of 12 straights so I should be able to get two short sections out of those.
 Finally a view of what the layout is about. The train running over the bridge. In this specially posed shot you'll see a new item of rolling stock. A weathered Railbox from MicroTrains.
 I like Railboxes as readers of my other blogs will know. This one is a gem and looks like a pretty good representation to me. Perhaps I'll write more on it another day. But right now dinner is almost ready, so I'll bid you all adieu, 'til next time.
Saturday, April 16, 2011
Shopping (a bit of a soapbox)
Just got back from a day trip to St. Cloud, MN this morning the Minnesota MG group had an open house for the members being as I own a 76 MGB I went along to introduce myself. I showed them pictures of my baby. Which they were all very nice and complimentary about and I lusted after some of the other attendees cars especially one members 1961 MGA. But my total adoration was reserved for a wonderful E-Type Jag in the workshop. But I digress...
After that I went over to Bakers Hobby Supply in Waite Park. A true local Hobby shop. Carrying something for many types of craft and hobby with a growing model railway section so I picked up some trees and fine leaf foliage for the layout. I can't say enough about supporting your local hobby shop. Yes the internet offers you great deals and cheap prices but sometimes it's just better and more fun to go to your LHS and talk and buy. Talking to the owner today he expressed an interest in me displaying Gonou, my T scale layout in his shop. I would certainly be interested in taking him up on that offer. If that could get more people interested in the hobby then great. People today need creative hobbies instead of playing with their X-station-Playbox360's to my mind.
Next trip was to Michaels, the craft superstore. I needed a new hot wire foam cutter the one I bought from them 12 years ago died a death recently and I needed a new one to shape the foam on the layout for the ground.
Twelve years ago I paid $1.99 for a cutter in a closing down sale. It was no more than a cardboard tube to hold the batteries with a cutting frame attached. This one cost me a whopping $9.99! But at least it has a plastic tube to hold the batteries and a proper on-off switch. Better than paying $40-50 for the woodland scenics mains powered one.
There were are lots of stuff bought and lots to do. I still have to catch up on todays Indian Premier League Twenty20 cricket yet too...
Thursday, April 14, 2011
Visualising the layout
Here you are then, after the bad news of the flexible stone material. Some good news.
A first look at the blocking in for the layout.
 Just an oval of track with a bridge going over a river scene. There will be lots of trees around to cover the exits to the rear and a nice sweeping sky backdrop hiding the back of the loop.
Should do the job quite admirably I think.
I'd better get a move on its only 2 weeks to the Granite City Train show.
One step forward...
... two steps back.
Well probably no more than one step back, perhaps just a trip and stumble but I digress.
The other day the Chooch flexible stone arrived. Just one look at it and I was really impressed. I was fired up and wanted to get it on the bridge abutments there and then.
But as things progressed with the material I began to realise that perhaps things wouldn't be all that perfect.
The finish on the material is excellent, there is no doubt about that. But the flexibility and the adhesive on the material bothered me, and as I began to cut and stick it to the styrene my worries grew. The material is flexible yes. But It didn't want to go around all the right angled corners and steps on my abutments. Then there was the adhesive. Sticky, no doubt. Tacky might be a better word. It didn't want to hold the material in place. It slid about a lot and sure enough when I went back to the abutment I'd covered the next day. This was the sight that greeted me
 Not good.
Perhaps If I'd put a coat od primer paint on the styrene...
Not to worry. I'm currently building new abutments out of card. The material seems to stick better to that.
Those are currently setting at the moment I'll probably get to cover them this weekend.
Subscribe to:
Posts (Atom)